Hello fellows, in this article I will be writing about one of the latest services that I have been studying: Azure Storage. Hence this is my first article here I will start explaining what is Azure and then just straight to the point. 🐱💻
What is Azure?
 Source: download.logo.wine/logo/Microsoft_Azure/Mic..
Microsoft Azure, commonly referred to as Azure, is a cloud computing service created by Microsoft for building, testing, deploying, and managing applications and services through Microsoft-managed data centers.
Azure offers different solutions to work with, including Infrastructure as a Service (IaaS), Platform as a Service (PaaS), and Software as a Service (SaaS) that can be used for services such as analytics, virtual computing, storage, networking, and much more.
This allows us to quickly build solutions and architectures on the cloud without having to worry about investing in physical equipment, upgrades, or critical issues.
So, with that said...
What is Azure Storage? 🤔
Azure Storage is a managed service that provides durable, secure, and scalable storage in the cloud.
The Azure Storage platform includes the following data services:
- Azure Blobs: A massively scalable object store for text and binary data. Also includes support for big data analytics through Data Lake Storage Gen2
- Azure Files: Managed file shares for cloud or on-premises deployments
- Azure Queues: A messaging store for reliable messaging between application components
- Azure Tables: A NoSQL store for schemaless storage of structured data
- Azure Disks: Block-level storage volumes for Azure VMs
All of these data types (except for Azure Disks) in Azure Storage are accessible from anywhere in the world over HTTP or HTTPS. Microsoft provides SDKs for Azure Storage in various languages and a REST API.
GET https://[url-for-service-account]/?comp=list&include=metadata
This would return an XML block like this:
<?xml version="1.0" encoding="utf-8"?>
<EnumerationResults AccountName="https://[url-for-service-account]/">
  <Containers>
    <Container>
      <Name>container1</Name>
      <Url>https://[url-for-service-account]/container1</Url>
      <Properties>
        <Last-Modified>Sun, 24 Sep 2018 18:09:03 GMT</Last-Modified>
        <Etag>0x8CAE7D0C4AF4487</Etag>
      </Properties>
      <Metadata>
        <Color>orange</Color>
        <ContainerNumber>01</ContainerNumber>
        <SomeMetadataName>SomeMetadataValue</SomeMetadataName>
      </Metadata>
    </Container>
    <Container>
      <Name>container2</Name>
      <Url>https://[url-for-service-account]/container2</Url>
      <Properties>
        <Last-Modified>Sun, 24 Sep 2018 17:26:40 GMT</Last-Modified>
        <Etag>0x8CAE7CAD8C24928</Etag>
      </Properties>
      <Metadata>
        <Color>pink</Color>
        <ContainerNumber>02</ContainerNumber>
        <SomeMetadataName>SomeMetadataValue</SomeMetadataName>
      </Metadata>
    </Container>
  </Containers>
  <NextMarker>container3</NextMarker>
</EnumerationResults>
However, this approach requires a lot of manual parsing and the creation of HTTP packets to work with each API. For this reason, Azure provides pre-built client libraries that make working with the service easier for common languages and frameworks.
...
Yes, but... what can we do with that?!?!
 Source: i.pinimg.com/564x/ed/26/f4/ed26f42b48d12dbe..
Well, there are different use cases for this service such as:
- Replace or supplement on-premises file servers or NAS (Network Attached Storage) devices
- Support streaming and random access scenarios
- Build enterprise Data Lake on Azure and perform big data analytics
- Want to decouple application components and use asynchronous messaging to communicate between them
- Store flexible datasets like user data for web applications, address books, device information, or other types of metadata your service requires
In our case, we are going to build a proof of concept uploading a file through a .NET Core console application to our own Azure Storage account.
Let's get started!... but first the requirements:
- .NET Core SDK
- Visual Studio Code
- An azure account 😉
1. Create an Azure Storage account
The fastest way to create an Azure Storage account would be through the Azure portal, searching for "Storage accounts" in the search bar, click to the add button and fill in the form. Therefore, we are going to do it by the tough way, cloud shell.
Since is our first time working with the Azure Cloud Shell, after selecting the next option:

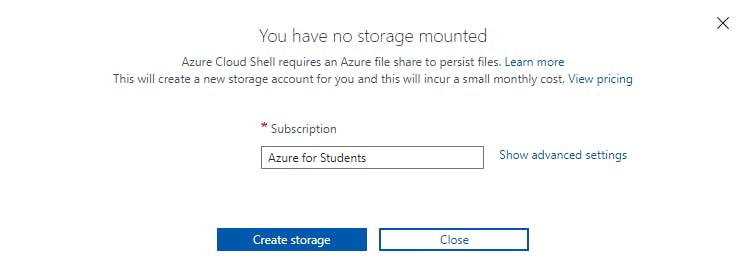
The Cloud Shell will show us the next message:

On the first launch, Cloud Shell prompts us to create a resource group, storage account, and Azure Files share on your behalf. This is a one-time step and will be automatically attached for all sessions. A single file share can be mapped and will be used by both Bash and PowerShell in Cloud Shell.
To keep the sense of the exercise, let's click the "Create storage" and move ahead. If you want to know a bit more about this prompt I will leave you documentation with much more detail.
Now we are going to create a resource group:
az group create -l westus -n MyBlogResourceGroup
And then the Azure Storage account (replace [name] with your unique storage account name)
az storage account create \
  --resource-group MyBlogResourceGroup \
  --location eastus \
  --sku Standard_LRS \
  --name [name]
2. Create an app to work with Azure Storage
We will open a command-line session, and create a new .NET Core Console application with the name "PhotoSharingApp". We can add the -o or --output flag to create the app in a specific folder.
dotnet new console --name PhotoSharingApp
Change the directory
cd PhotoSharingApp
And run the app to make sure it builds and run correctly. 🐱👤
dotnet run
It should return a "Hello World" message. 👋🏼
3. Add Azure Storage configuration to your app
Now let's create a JSON configuration file that will hold the connection string information to connect our app with our storage account.
We would use the touch/ni tool on the command line to create a file named appsettings.json.
-- Bash
touch appsettings.json

-- PowerShell
ni appsettings.json
Select the appsettings.json file in the editor and add the following text. Save the file.
{
    "ConnectionStrings": {
        "StorageAccount": "[value]"
    }
}
Now we need to get the storage account connection string and place it into the configuration for our app. In Cloud Shell, let's run the following command. Replace [name] with our unique storage account name.
az storage account show-connection-string \
  --resource-group MyBlogResourceGroup \
  --query connectionString \
  --name [name]
Copy the connection string that is returned from that command, and replace in the appsettings.json file with this connection string. Save the file.
Next, we have to open the project file, PhotoSharingApp.csproj, in the editor.
Add the following configuration block to the file in the project. Add from the existing code.
<ItemGroup>
    <None Update="appsettings.json">
        <CopyToOutputDirectory>PreserveNewest</CopyToOutputDirectory>
    </None>
    <!--  Package references... -->
</ItemGroup>
Remember to save the file 👀.
And then run the following command:
dotnet add package Microsoft.Extensions.Configuration.Json
This is a package to support to read a JSON configuration file.
Now we are going to add the required code to initialize the configuration system to read from the appsettings.json file (the one with the connection string), replacing the code within the Main method with the next one:
 var builder = new ConfigurationBuilder()
      .SetBasePath(Directory.GetCurrentDirectory())
      .AddJsonFile("appsettings.json");

var configuration = builder.Build();
And the using statements required to read our file and make our code work.
using Microsoft.Extensions.Configuration;
using System.IO;
The code should now look like this:
using System;
using Microsoft.Extensions.Configuration;
using System.IO;

namespace PhotoSharingApp
{
    class Program
    {
        static void Main(string[] args)
        {
            var builder = new ConfigurationBuilder()
                .SetBasePath(Directory.GetCurrentDirectory())
                .AddJsonFile("appsettings.json");

            var configuration = builder.Build();
        }
    }
}
Now that we have that all wired up, we can start adding code to use our storage account.
4. Connect our application to our Azure Storage account
In Azure, the storage accounts organize the files into one or more containers that store the actual blob objects (files). These containers work similar to the folders in a file system, therefore we are going to create a container in our storage account to store our photos using the Azure Storage Blobs client library.
First, let's add Azure.Storage.Blobs package to the application.
dotnet add package Azure.Storage.Blobs
After it's done, let's add the following command to Program.cs.
using Azure.Storage.Blobs;
Now let's add the following code to get the connection string, create an instance of the blob container object, and create the photos container.
var connectionString = configuration.GetConnectionString("StorageAccount");
string containerName = "photos";

var container = new BlobContainerClient (connectionString, containerName);
container.CreateIfNotExists();
Run the application to create our new container and then check if it works with the next command. Remember to replace [name] with the name of our storage account.
az storage container list \
-- account-name [name]
5. Upload an image to our Azure Storage Account
Now let's run the next command in the same folder as our application to download the image that we will be using uploading.
wget https://github.com/MicrosoftDocs/mslearn-connect-app-to-azure-storage/blob/main/images/docs-and-friends-selfie-stick.png?raw=true -O docs-and-friends-selfie-stick.png
Then add the next piece of code to finally upload the image into our storage account and write a log in the console listing all the blobs in the container that we built before.
// Uploads the image to Blob storage.  If a blob already exists with this name it will be overwritten
string blobName = "docs-and-friends-selfie-stick";
string fileName = "docs-and-friends-selfie-stick.png";
BlobClient blobClient = container.GetBlobClient(blobName);
blobClient.Upload(fileName, true);

// List out all the blobs in the container
var blobs = container.GetBlobs();
foreach (var blob in blobs)
{
    Console.WriteLine($"{blob.Name} --> Created On {blob.Properties.CreatedOn:yyyy-MM-dd HH:mm:ss}  Size {blob.Properties.ContentLength}");
}
Now, if you made it up to here...
Congratulations!, we built our own .NET Core application, connected it to an Azure Storage account through the client app library and uploaded our photo image.

Conclusion
That's the gist of the Azure Storage account! There are many other use cases and projects that we could build with this service, hence there are more data types that we have not used yet. Thanks for reading this article. I hope it was helpful for Azure beginners or a gentle reminder for more veterans. Please feel free to ask questions in the comments below. Ultimately, practicing and building projects with this service will help you to get to know it better.
Now let's start working on the next project 👨🏼💻. Stay tuned!
